VIỆN CÔNG NGHỆ VÀ ĐÀO TẠO DEVMASTER
Đào tạo - Phần mềm - Cho thuê nhân sự
VIỆN CÔNG NGHỆ VÀ ĐÀO TẠO DEVMASTER
Đào tạo - Phần mềm - Cho thuê nhân sự
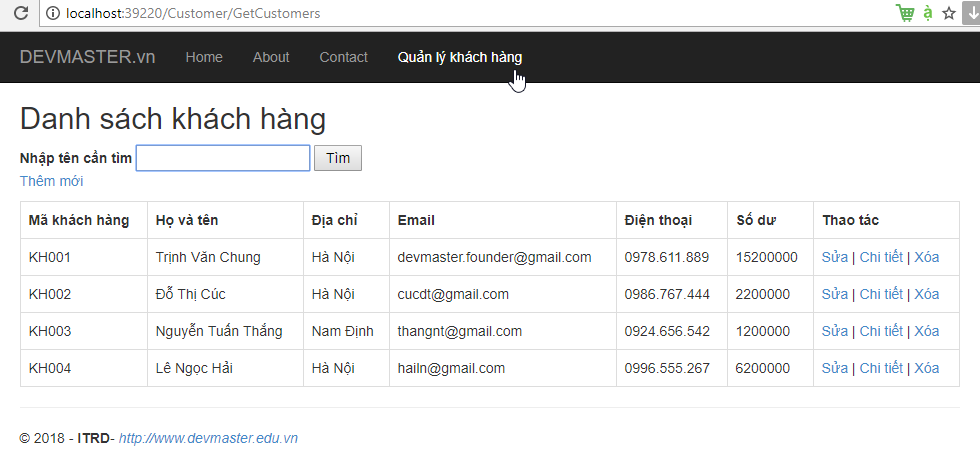
Tạo ứng dụng ASP.NET MVC 5 và sử dụng tính năng Scaffolding của Visual Studio để sinh View dựa trên model class “Customer”, thông tin Customer như Lab 04.1. Các thao tác cần thực hiện là hiển thị, tìm kiếm theo tên, thêm, xóa, sửa, xem chi tiết.
Bước 1: Kích chuột phải vào Solution “Lab04” -> chọn Add -> Chọn New Project -> Chọn ASP.NET Web Application và đặt tên project “Lab04_2” -> OK -> Chọn MVC và No Authentication -> OK.
Bước 2: Mở trang _Layout.cshtml trong đường dẫn /View/Shared/_Layout.cshtml và tìm đoạn code sau và thêm vào đúng vị trí
<div class="navbar-collapse collapse">
<ul class="nav navbar-nav">
<li>@Html.ActionLink("Home", "Index", "Home")</li>
<li>@Html.ActionLink("About", "About", "Home")</li>
<li>@Html.ActionLink("Contact", "Contact", "Home")</li>
<li>@Html.ActionLink("Quản lý khách hàng", "GetCustomers", "Customer")</li>
</ul>
</div>
Bước 3: Tạo lớp “Customer” trong thư mục Models với code gợi ý như sau:
//định nghĩa lớp Customer
public class Customer
{
public string CustomerId { get; set; }
public string FullName { get; set; }
public string Address { get; set; }
public string Email { get; set; }
public string Phone { get; set; }
public int Balance { get; set; }
}
Bước 4: Tạo giao diện “ICustomerRepository” trong thư mục Modes với code gợi ý sau:
//định nghĩa giao diện khách hàng
public interface ICustomerRepository
{
//khai báo phương thức lấy danh sách khách hàng
IList<Customer> GetCustomers();
//khai báo phương thức lấy khách hàng
Customer GetCustomer(string customerId);
//khai báo phương thức thêm khách hàng
void AddCustomer(Customer cus);
//khai báo phương thức cập nhật khách hàng
void UpdateCustomer(Customer cus);
//khai báo phương thức tìm kiếm khách hàng
IList<Customer> SearchCustomer(string name);
//khai báo phương thức xóa khách hàng
void DeleteCustomer(Customer cus);
}
Bước 5: Tạo lớp “CustomerRepository” trong thư mục Modes thực thi từ giao diện ICustomerRepository với code gợi ý sau:
//định nghĩa lớp CustomerRepository thực thi từ giao diện ICustomerRepository
public class CustomerRepository : ICustomerRepository
{
//khởi tạo danh sách khách hàng
static readonly List<Customer> data = new List<Customer>()
{
new Customer(){ CustomerId = "KH001",
FullName = "Trịnh Văn Chung",Address = "Hà Nội",
Email = "devmaster.founder@gmail.com",
Phone = "0978.611.889",Balance = 15200000},
new Customer(){ CustomerId = "KH002",
FullName = "Đỗ Thị Cúc",Address = "Hà Nội",
Email = "cucdt@gmail.com",Phone = "0986.767.444",
Balance = 2200000},
new Customer(){ CustomerId = "KH003",
FullName = "Nguyễn Tuấn Thắng",Address = "Nam Định",
Email = "thangnt@gmail.com",Phone = "0924.656.542",
Balance = 1200000},
new Customer(){ CustomerId = "KH004",
FullName = "Lê Ngọc Hải",Address = "Hà Nội",
Email = "hailn@gmail.com",Phone = "0996.555.267",
Balance = 6200000}
};
//thực thi phương thức lấy danh sách khách hàng
public IList<Customer> GetCustomers()
{
return data;
}
//thực thi phương thức tìm khách hàng theo tên
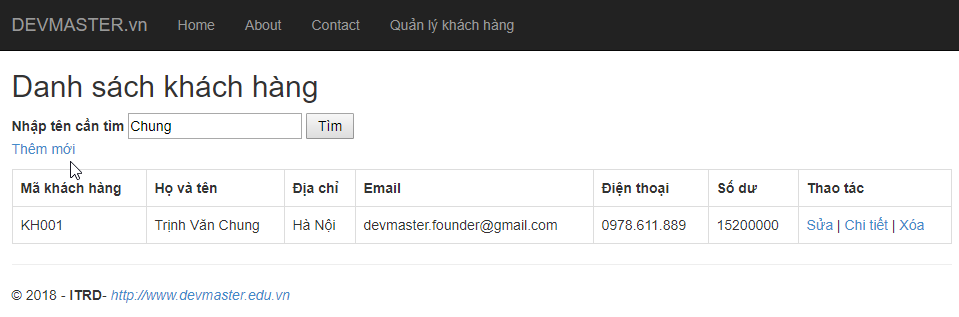
public IList<Customer> SearchCustomer(string name)
{
return data.Where(c=>c.FullName.EndsWith(name)).ToList();
}
//thực thi phương thức lấy khách hàng theo Id
public Customer GetCustomer(string customerId)
{
return data.FirstOrDefault(c => c.CustomerId.Equals(customerId));
}
//thực thi phương thức thêm khách hàng
public void AddCustomer(Customer cus)
{
data.Add(cus);
}
//thực thi phương thức cập nhật khách hàng
public void UpdateCustomer(Customer cus)
{
//lấy khách hàng theo id
var customer = data.FirstOrDefault(c => c.CustomerId.Equals(cus.CustomerId));
//nếu có thì sửa thông tin
if(customer!=null)
{
customer.FullName = cus.FullName;
customer.Address = cus.Address;
customer.Email = cus.Email;
customer.Phone = cus.Phone;
customer.Balance = cus.Balance;
}
}
//thực thi phương thức xóa khách hàng
public void DeleteCustomer(Customer cus)
{
data.Remove(cus);
}
}
Bước 6: Tạo Controller “CustomerController” trong thư mục Controllers
public class CustomerController : Controller
{
//khai báo biến CustomerRepository
static CustomerRepository listCustomer;
public CustomerController()
{
//khởi tạo CustomerRepository
listCustomer = new CustomerRepository();
}
// GET: /Customer/GetCustomers
public ActionResult GetCustomers()
{
return View(listCustomer.GetCustomers());
}
//POST: /Customer/GetCustomers
[HttpPost]
public ActionResult GetCustomers(string name)
{
return View(listCustomer.SearchCustomer(name));
}
// GET: /Customer/Details/5
public ActionResult Details(string id)
{
return View(listCustomer.GetCustomer(id));
}
// GET: /Customer/Create
public ActionResult Create()
{
return View();
}
// POST: /Customer/Create
[HttpPost]
public ActionResult Create(Customer cus)
{
listCustomer.AddCustomer(cus);
return RedirectToAction("GetCustomers");
}
// GET: /Customer/Edit/5
public ActionResult Edit(string id)
{
return View(listCustomer.GetCustomer(id));
}
// POST: /Customer/Edit
[HttpPost]
public ActionResult Edit(Customer cus)
{
listCustomer.UpdateCustomer(cus);
return RedirectToAction("GetCustomers");
}
// GET: /Customer/Delete/5
public ActionResult Delete(string id)
{
listCustomer.DeleteCustomer(listCustomer.GetCustomer(id));
return RedirectToAction("GetCustomers");
}
}
Bước 7: Tạo các View ứng với các Action trong Controller
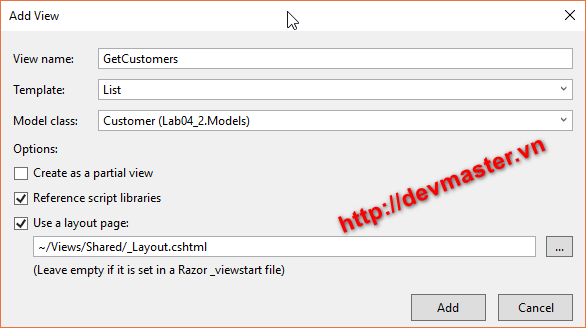
Sau đó chỉnh sửa lại code Razor theo gợi ý sau:
@model IEnumerable<Lab04_2.Models.Customer>
@{
ViewBag.Title = "Danh sách khách hàng";
Layout = "~/Views/Shared/_Layout.cshtml";
}
<h2>Danh sách khách hàng</h2>
@using (Html.BeginForm())
{
<b>Nhập tên cần tìm </b> @Html.TextBox("name")
<input type="submit" value=" Tìm " />
}
<p>
@Html.ActionLink("Thêm mới", "Create")
</p>
<table class="table table-bordered">
<tr>
<th>
Mã khách hàng
</th>
<th>
Họ và tên
</th>
<th>
Địa chỉ
</th>
<th>
</th>
<th>
Điện thoại
</th>
<th>
Số dư
</th>
<th>Thao tác</th>
</tr>
@foreach (var item in Model)
{
<tr>
<td>
@Html.DisplayFor(modelItem => item.CustomerId)
</td>
<td>
@Html.DisplayFor(modelItem => item.FullName)
</td>
<td>
@Html.DisplayFor(modelItem => item.Address)
</td>
<td>
@Html.DisplayFor(modelItem => item.Email)
</td>
<td>
@Html.DisplayFor(modelItem => item.Phone)
</td>
<td>
@Html.DisplayFor(modelItem => item.Balance)
</td>
<td>
@Html.ActionLink("Sửa", "Edit", new { id = item.CustomerId }) |
@Html.ActionLink("Chi tiết", "Details", new { id = item.CustomerId }) |
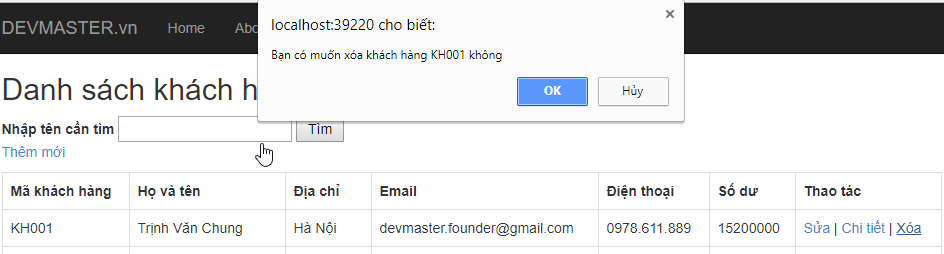
@Html.ActionLink("Xóa", "Delete", new { id = item.CustomerId }, new { onclick = "return confirm('Bạn có muốn xóa khách hàng " + item.CustomerId + " không')" })
</td>
</tr>
}
</table>
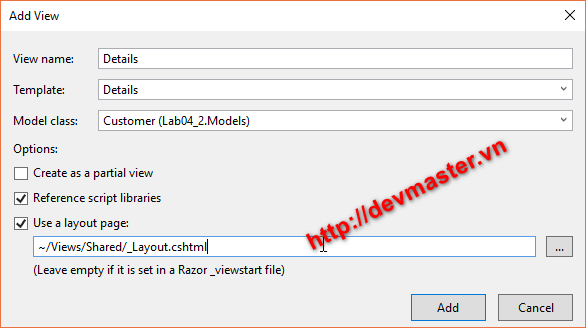
Sau đó chỉnh lại code Razor theo gợi ý sau:
@model Lab04_2.Models.Customer
@{
ViewBag.Title = "Thông tin chi tiết khách hàng";
Layout = "~/Views/Shared/_Layout.cshtml";
}
<div>
<h3>Thông tin chi tiết</h3>
<hr />
<dl class="dl-horizontal">
<dt>
Mã khách hàng
</dt>
<dd>
@Html.DisplayFor(model => model.CustomerId)
</dd>
<dt>
Họ và tên
</dt>
<dd>
@Html.DisplayFor(model => model.FullName)
</dd>
<dt>
Địa chỉ
</dt>
<dd>
@Html.DisplayFor(model => model.Address)
</dd>
<dt>
</dt>
<dd>
@Html.DisplayFor(model => model.Email)
</dd>
<dt>
Điện thoại
</dt>
<dd>
@Html.DisplayFor(model => model.Phone)
</dd>
<dt>
Số dư
</dt>
<dd>
@Html.DisplayFor(model => model.Balance)
</dd>
</dl>
</div>
<p>
@Html.ActionLink("Sửa", "Edit", new { id = Model.CustomerId }) |
@Html.ActionLink("Quay lại", "GetCustomers")
</p>
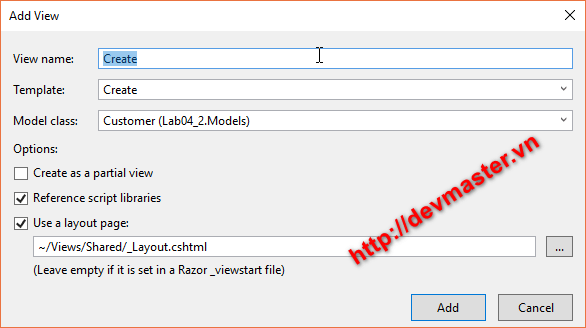
Sau đó chỉnh sửa lại code Razor theo gợi ý sau:
@model Lab04_2.Models.Customer
@{
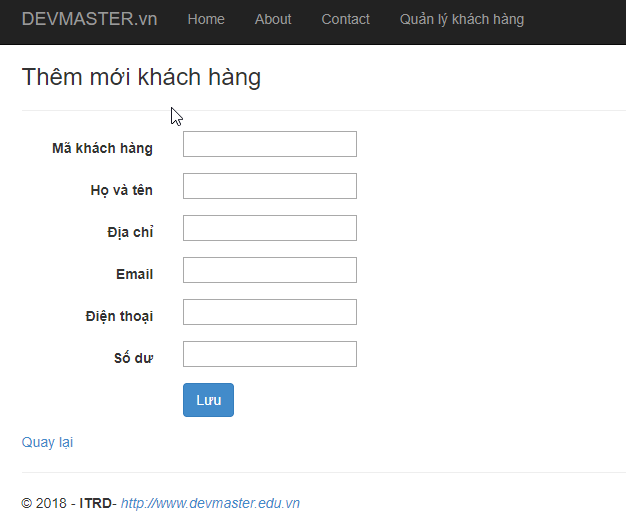
ViewBag.Title = "Thêm mới khách hàng";
Layout = "~/Views/Shared/_Layout.cshtml";
}
@using (Html.BeginForm())
{
@Html.AntiForgeryToken()
<div class="form-horizontal">
<h3>Thêm mới khách hàng</h3>
<hr />
@Html.ValidationSummary(true)
<div class="form-group">
@Html.Label("Mã khách hàng", new { @class = "control-label col-md-2" })
<div class="col-md-10">
@Html.EditorFor(model => model.CustomerId)
@Html.ValidationMessageFor(model => model.CustomerId)
</div>
</div>
<div class="form-group">
@Html.Label("Họ và tên", new { @class = "control-label col-md-2" })
<div class="col-md-10">
@Html.EditorFor(model => model.FullName)
@Html.ValidationMessageFor(model => model.FullName)
</div>
</div>
<div class="form-group">
@Html.Label("Địa chỉ", new { @class = "control-label col-md-2" })
<div class="col-md-10">
@Html.EditorFor(model => model.Address)
@Html.ValidationMessageFor(model => model.Address)
</div>
</div>
<div class="form-group">
@Html.Label("Email", new { @class = "control-label col-md-2" })
<div class="col-md-10">
@Html.EditorFor(model => model.Email)
@Html.ValidationMessageFor(model => model.Email)
</div>
</div>
<div class="form-group">
@Html.Label("Điện thoại", new { @class = "control-label col-md-2" })
<div class="col-md-10">
@Html.EditorFor(model => model.Phone)
@Html.ValidationMessageFor(model => model.Phone)
</div>
</div>
<div class="form-group">
@Html.Label("Số dư", new { @class = "control-label col-md-2" })
<div class="col-md-10">
@Html.EditorFor(model => model.Balance)
@Html.ValidationMessageFor(model => model.Balance)
</div>
</div>
<div class="form-group">
<div class="col-md-offset-2 col-md-10">
<input type="submit" value=" Lưu " class="btn btn-default" />
</div>
</div>
</div>
}
<div>
@Html.ActionLink("Quay lại", "GetCustomers")
</div>
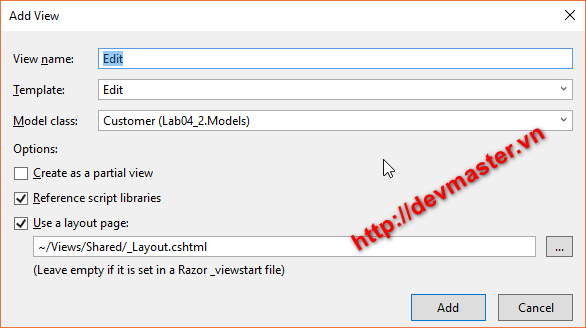
Sau đó chỉnh sửa code Razor theo gợi ý sau:
@model Lab04_2.Models.Customer
@{
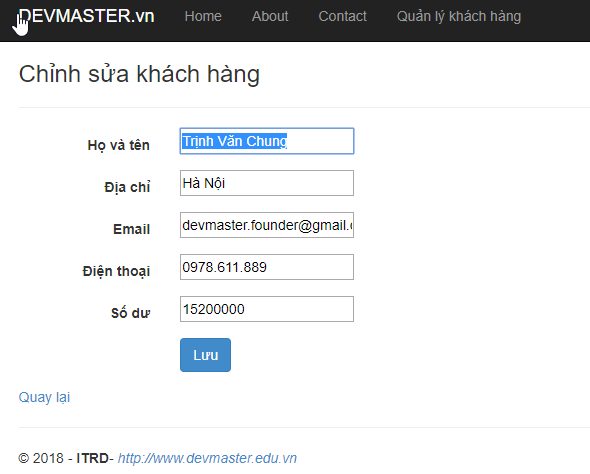
ViewBag.Title = "Chỉnh sửa khách hàng";
Layout = "~/Views/Shared/_Layout.cshtml";
}
@using (Html.BeginForm())
{
@Html.AntiForgeryToken()
<div class="form-horizontal">
<h3>Chỉnh sửa khách hàng</h3>
<hr />
@Html.ValidationSummary(true)
@Html.HiddenFor(model => model.CustomerId)
<div class="form-group">
@Html.Label("Họ và tên", new { @class = "control-label col-md-2" })
<div class="col-md-10">
@Html.EditorFor(model => model.FullName)
@Html.ValidationMessageFor(model => model.FullName)
</div>
</div>
<div class="form-group">
@Html.Label("Địa chỉ", new { @class = "control-label col-md-2" })
<div class="col-md-10">
@Html.EditorFor(model => model.Address)
@Html.ValidationMessageFor(model => model.Address)
</div>
</div>
<div class="form-group">
@Html.Label("Email", new { @class = "control-label col-md-2" })
<div class="col-md-10">
@Html.EditorFor(model => model.Email)
@Html.ValidationMessageFor(model => model.Email)
</div>
</div>
<div class="form-group">
@Html.Label("Điện thoại", new { @class = "control-label col-md-2" })
<div class="col-md-10">
@Html.EditorFor(model => model.Phone)
@Html.ValidationMessageFor(model => model.Phone)
</div>
</div>
<div class="form-group">
@Html.Label("Số dư", new { @class = "control-label col-md-2" })
<div class="col-md-10">
@Html.EditorFor(model => model.Balance)
@Html.ValidationMessageFor(model => model.Balance)
</div>
</div>
<div class="form-group">
<div class="col-md-offset-2 col-md-10">
<input type="submit" value=" Lưu " class="btn btn-default" />
</div>
</div>
</div>
}
<div>
@Html.ActionLink("Quay lại", "GetCustomers")
</div>
Bước 8: Browse trang Index.cshtml và kích vào các link để kiểm tra kết quả

Nguồn: Devmaster Academy


")
 - FullStack")

.png "Lập trình frontend với reacjs (Full)")

