

Đang load dữ liệu

Tạo ứng dụng ASP.NET MVC5 thực hiện những công việc sau:
Bước 1: Mở Visual Studio 2017 -> vào File -> New -> Projects -> Chọn Web -> ASP.NET Web Appliction -> Nhập tên project -> Chọn đường dẫn lưu trữ -> Nhập tên solution -> Nhấn OK (xem hình dưới).
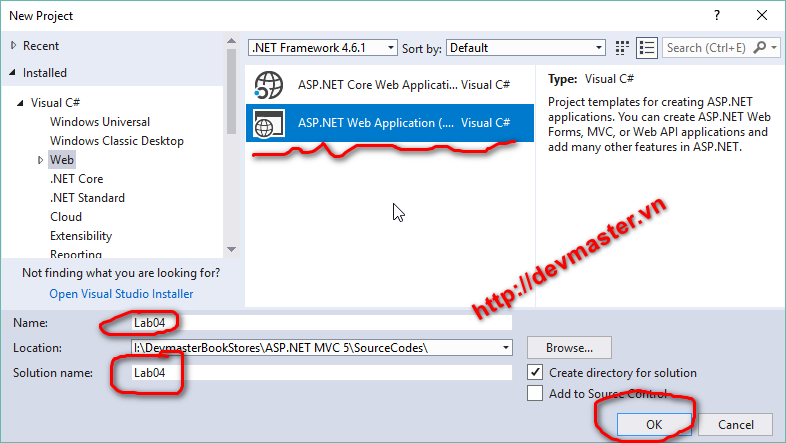
Nhấn OK -> màn hình tiếp theo xuất hiện bạn chọn template là MVC sau đó chọn Change Authentication -> No Authentication -> OK -> OK ( Xem hình bên dưới)
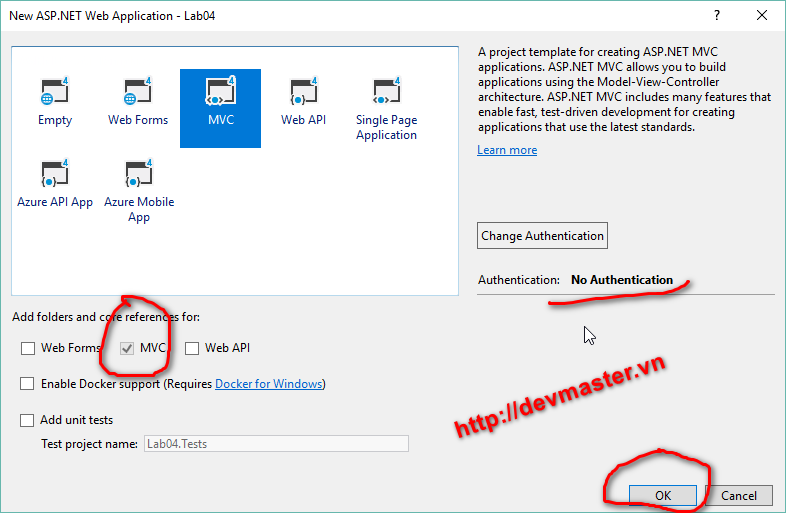
Bước 2: Kích chuột phải vào thư mục Models chọn Add -> Class -> Nhập tên “Customer” -> Add và code như sau:
namespace Lab04.Models
{
public class Customer
{
public string CustomerId { get; set; }
public string FullName { get; set; }
public string Address { get; set; }
public string Email { get; set; }
public string Phone { get; set; }
public int Balance { get; set; }
}
}
Bước 3: Mở trang _Layout.cshtml trong đường dẫn /View/Shared/_Layout.cshtml và tìm đoạn code sau và thêm vào đúng vị trí
<div class="navbar-collapse collapse">
<ul class="nav navbar-nav">
<li>@Html.ActionLink("Khách hàng", "CustomerDetail", "Customer")li>
<li>@Html.ActionLink("Danh sách khách hàng", "CustomerList", "Customer")li>
ul>
div>
Bước 4: Kích chuột phải vào thư mục Controllers chọn Add -> Controller ->Nhập tên controller -> Add
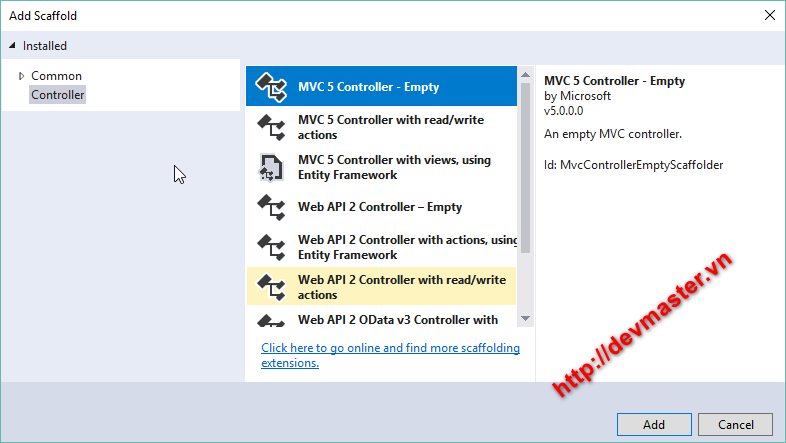

Bước 5: Code cho CustomerController như sau
public class CustomerController : Controller
{
// GET: /Customer/CustomerDetail (action trả về thông tin chi tiết 1 khách hàng cho view CustomerDetail
public ActionResult CustomerDetail()
{
//tạo một đối tượng Customer ( nhớ using Lab04.Models vào nhé)
Customer cus = new Customer()
{
CustomerId = "KH001",
FullName = "Trịnh Văn Chung",
Address = "Hà Nội",
Email = "devmaster.founder@gmail.com",
Phone = "0978.611.889",
Balance = 15200000
};
//cách 1 gán dữ liệu vào ViewBag để chuyển tới View
//ViewBag.customer = cus;
//return View();
//có thể truyền dữ liệu qua đối tượng model để chuyển tới View
return View(cus);
}
//GET /Product/CustomerList (action trả về danh sách khách hàng cho view CustomerList)
public ActionResult CustomerList()
{
//tạo một danh sách khách hàng
List<Customer> listcustomer = new List<Customer>(){
new Customer(){ CustomerId = "KH001",
FullName = "Trịnh Văn Chung",
Address = "Hà Nội",Email = "devmaster.founder@gmail.com",
Phone = "0978.611.889",Balance = 15200000},
new Customer(){ CustomerId = "KH002", FullName = "Đỗ Thị Cúc",
Address = "Hà Nội",Email = "cucdt@gmail.com",
Phone = "0986.767.444",Balance = 2200000},
new Customer(){ CustomerId = "KH003",
FullName = "Nguyễn Tuấn Thắng",
Address = "Nam Định",Email = "thangnt@gmail.com",
Phone = "0924.656.542",Balance = 1200000},
new Customer(){ CustomerId = "KH004", FullName = "Lê Ngọc Hải",
Address = "Hà Nội",Email = "hailn@gmail.com",
Phone = "0996.555.267",Balance = 6200000 }
};
//gán dữ liệu vào ViewBag để chuyển qua View
ViewBag.listcustomer = listcustomer;
return View();
}
}
Bước 6: Kích chuột phải vào tên phương thức CustomerDetail chọn Add View -> nhấn Add
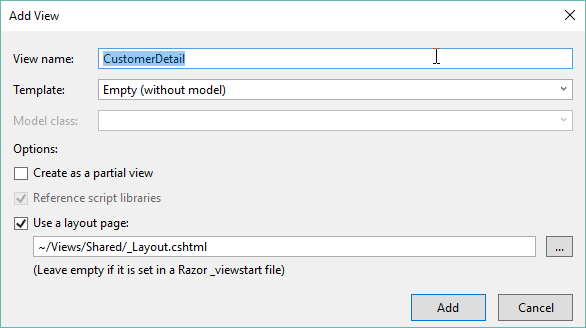
Bước 7: Code cho View CustomerDetail như sau: (CustomerDetail.cshtml)
@*lấy dữ liệu truyền qua đối tượng model theo cách 1*@
@model Lab04.Models.Customer
@{
ViewBag.Title = "Chi tiết khách hàng";
//lấy dữ liệu truyền qua đối tượng theo cách 2
//var customer = Model as Lab04.Models.Customer;
}
<h2>Chi tiết khách hàng lấy theo cách 1 h2>
<p>Mã số: @Model.CustomerId p>
<p>Họ và tên: @Model.FullName p>
<p>Địa chỉ: @Model.Address p>
<p>Điện thoại: @Model.Phone p>
<p>Email: @Model.Email p>
<p>Số tiền dư: @Model.Balance p>
@*
Mã số: @customer.CustomerId
Họ và tên: @customer.FullName
Địa chỉ: @customer.Address
Điện thoại: @customer.Phone
Email: @customer.Email
Số tiền dư: @customer.Balance
*@
@*
Mã số: @ViewBag.customer.CustomerId
Họ và tên: @ViewBag.customer.FullName
Địa chỉ: @ViewBag.customer.Address
Điện thoại: @ViewBag.customer.Phone
Email: @ViewBag.customer.Email
Số tiền dư: @ViewBag.customer.Balance
*@
Bước 8: Mở CustomerController kích chuột phải vào tên phương thức CustomerList chọn Add View -> nhấn Add
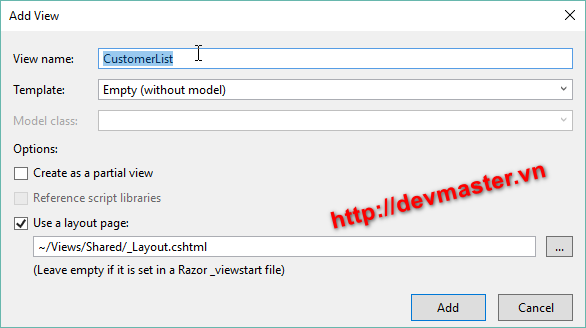
Bước 9: Code cho View CustomerList như sau: (CustomerList.cshtml)
@{
ViewBag.Title="Danh sách khách hàng";
//lấy danh sách khách hàng và convert data
var listcustomer = ViewBag.listcustomer as ListCustomer>;
}
<h2>Danh sách khách hàngh2>
<table class="table-bordered">
<thead>
<tr>
<th>Mã KHth>
<th>Họ và tênth>
<th>Địa chỉth>
<th>Emailth>
<th>Điện thoạith>
<th>Số dưth>
tr>
thead>
<tbody>
@*Hiển thị danh sách khách hàng*@
@foreach (var c in listcustomer)
{
<tr>
<td>@c.CustomerIdtd>
<td>@c.FullNametd>
<td>@c.Addresstd>
<td>@c.Emailtd>
<td>@c.Phonetd>
<td>@c.Balancetd>
tr>
}
tbody>
table>
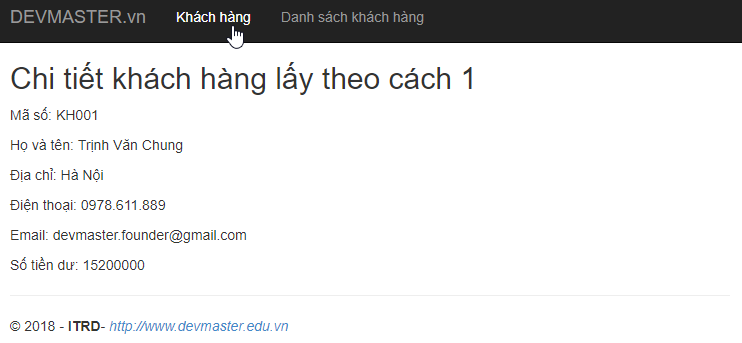
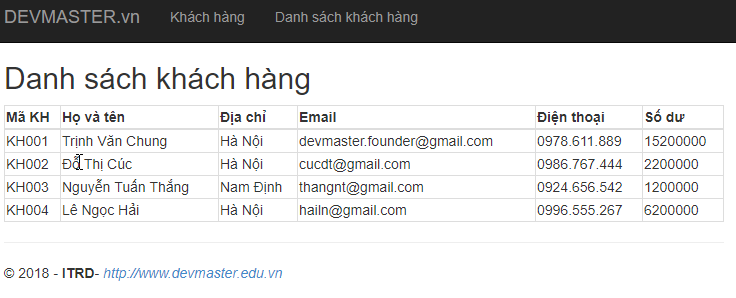
Bước 10: F5 để chạy và kích vào link “Khách hàng”, “Danh sách khách hàng” kiểm tra kết quả
Nguồn: Devmaster Academy