VIỆN CÔNG NGHỆ VÀ ĐÀO TẠO DEVMASTER
Đào tạo - Phần mềm - Cho thuê nhân sự
VIỆN CÔNG NGHỆ VÀ ĐÀO TẠO DEVMASTER
Đào tạo - Phần mềm - Cho thuê nhân sự
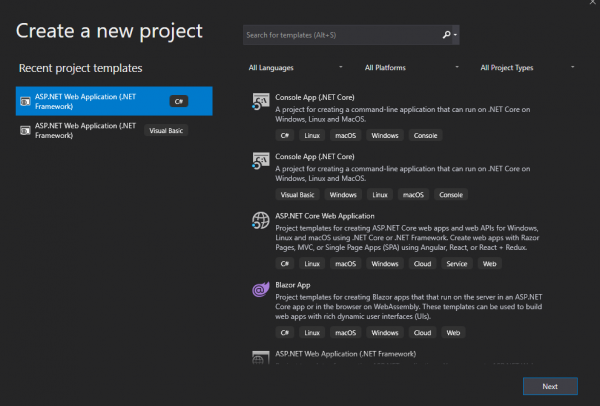
Bước 1: Mở Visual Studio 2019 chọn ASP.NET Web Application (.NET Framework) sau đó ấn Next.

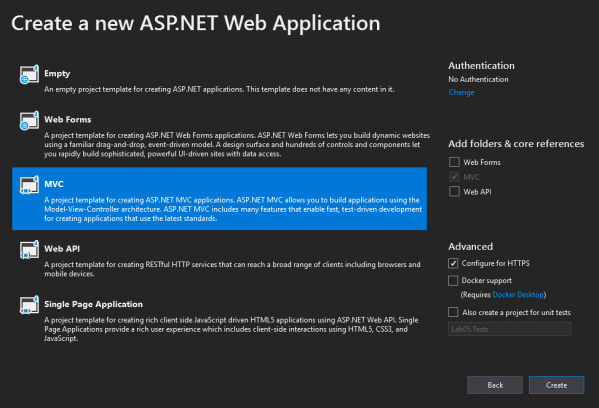
- Màn hình tiếp theo xuất hiện chọn MVC sau đó ấn Create (Xem hình bên dưới)
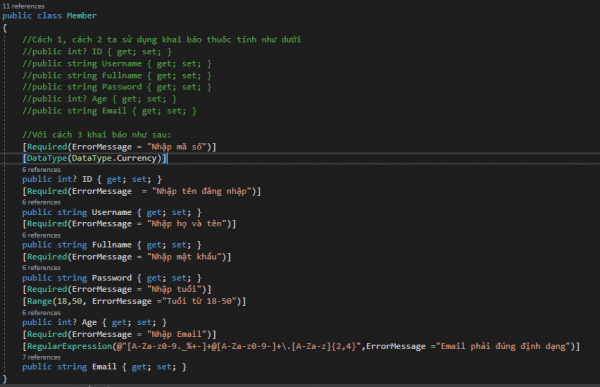
Bước 2: Kích chuột phải vào Model chọn Add ->Chọn Class->nhập Member và thêm code theo gợi ý sau:
Bước 3: Kích chuột phải vào Controller chọn Add ->Chọn Controller->nhập MemberController và thêm code theo gợi ý sau:
using System;
using System.Collections.Generic;
using System.Linq;
using System.Web;
using System.Web.Mvc;
using Lab05.Models;//Note
namespace Lab05.Controllers
{
public class MemberController : Controller
{
public ActionResult CreateOne()
{
return View();
}
[HttpPost]
public ActionResult CreateOne(Member m)
{
return View("Details", m);// chuyển dữ liệu tới View nếu nhập dữ liệu hợp lệ
}
public ActionResult CreateTwo()
{
return View();
}
[HttpPost]
public ActionResult CreateTwo(Member m)
{
if (m.ID == null)
{
ViewBag.error = "Nhập mã số";
return View();
}
if (m.Username == null)
{
ViewBag.error = "Nhập tên đăng nhập";
return View();
}
if (m.Fullname == null)
{
ViewBag.error = "Nhập họ và tên";
return View();
}
if (m.Age == null)
{
ViewBag.error = "Nhập tuổi";
return View();
}
if (m.Password == null)
{
ViewBag.error = "Nhập mật khẩu";
return View();
}
if (m.Email == null)
{
ViewBag.error = "Nhập Email";
return View();
}
string regexPattern = @"[A-Za-z0-9._%+-]+@[A-Za-z0-9-]+\.[A-Za-z]{2,4}";
if(!System.Text.RegularExpressions.Regex.IsMatch(m.Email,regexPattern))
{
ViewBag.error = "Hãy nhập đúng định dạng";
return View();
}
return View("Details", m);
}
public ActionResult CreateThree()
{
return View();
}
[HttpPost]
public ActionResult CreateThree(Member m)
{
if (ModelState.IsValid)
return View("Details", m);
else return View();
}
public ActionResult Details()
{
return View();
}
}
}
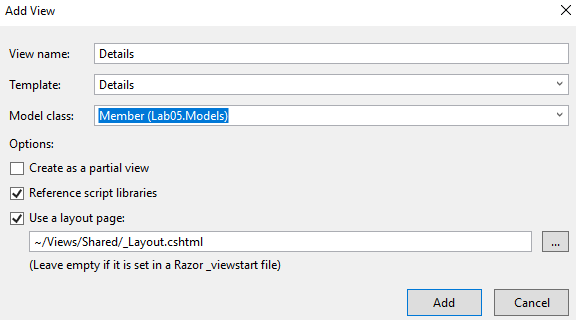
Bước 4: Kích chuột phải vào các Action trong Controller để tạo View:
- Details
Chỉnh lại code Razor theo gợi ý sau:
@model Lab05.Models.Member
@{
ViewBag.Title = "Details";
Layout = "~/Views/Shared/_Layout.cshtml";
}
<div>
<h3>Thông tin thành viên </h3>
<hr />
<dl class="dl-horizontal">
<dd>
Mã số
</dd>
<dt>
@Html.DisplayFor(model =>model.ID)
</dt>
<dt>
Tên đăng nhập
</dt>
<dd>
@Html.DisplayFor(model => model.Username)
</dd>
<dt>
Họ và tên
</dt>
<dd>
@Html.DisplayFor(model => model.Fullname)
</dd>
<dt>
Mật khẩu
</dt>
<dd>
@Html.DisplayFor(model => model.Password)
</dd>
<dt>
Tuổi
</dt>
<dd>
@Html.DisplayFor(model => model.Age)
</dd>
<dt>
</dt>
<dd>
@Html.DisplayFor(model => model.Email)
</dd>
</dl>
</div>
<p>
@Html.ActionLink("Quay lại", "CreateOne")
</p>
- CreateOne
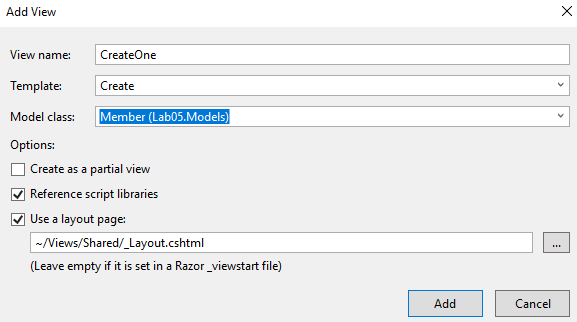
Chỉnh lại code Razor theo gợi ý sau:
@model Lab05.Models.Member
@{
ViewBag.Title = "Sử dụng HTML Validation data";
Layout = "~/Views/Shared/_Layout.cshtml";
}
<h2>Sử dụng HTML Validation data </h2>
@using (Html.BeginForm())
{
@Html.AntiForgeryToken()
<div class="form-horizontal">
<hr />
<div class="form-group">
@Html.Label("Mã thành viên", new { @class = "control-label col-md-2" })
<div class="col-md-10">
@Html.TextBoxFor(model => model.ID, new { Required = "Required", type = "number" })
</div>
</div>
<div class="form-group">
@Html.Label("Tên đăng nhập", new { @class = "control-label col-md-2" })
<div class="col-md-10">
@Html.TextBoxFor(model => model.Username, new { Required = "Required"})
</div>
</div>
@Html.Label("Họ và tên", new { @class = "control-label col-md-2" })
<div class="col-md-10">
@Html.TextBoxFor(model => model.Fullname, new { Required = "Required"})
<div class="form-group">
</div>
</div>
<div class="form-group">
@Html.Label("Mật khẩu", new { @class = "control-label col-md-2" })
<div class="col-md-10">
@Html.PasswordFor(model => model.Password, new { Required = "Required" })
</div>
</div>
<div class="form-group">
@Html.Label("Tuổi", new { @class = "control-label col-md-2" })
<div class="col-md-10">
@Html.TextBoxFor(model => model.Age, new { Required = "Required", type = "number", min = "18", max = "60" })
</div>
</div>
<div class="form-group">
@Html.Label("Email", new { @class = "control-label col-md-2" })
<div class="col-md-10">
@Html.TextBoxFor(model => model.Email, new { Required = "Required" })
</div>
</div>
<div class="form-group">
<div class="col-md-offset-2 col-md-10">
<input type="submit" value="Lưu" class="btn btn-default" />
</div>
</div>
</div>
}
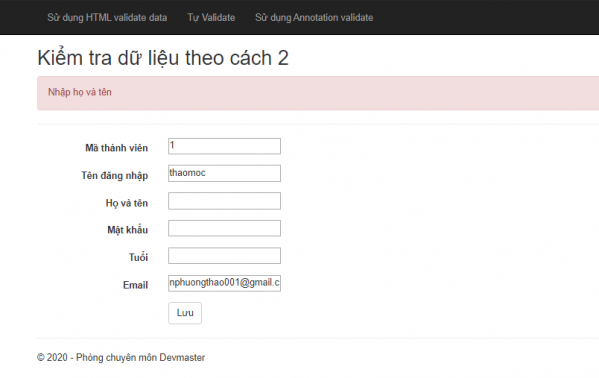
- CreateTwo (tạo View tương tự CreateOne) , chỉnh lại code Razor theo gợi ý sau:
@model Lab05.Models.Member
@{
ViewBag.Title = "Kiểm tra dữ liệu theo cách 2";
Layout = "~/Views/Shared/_Layout.cshtml";
}
<h2>Kiểm tra dữ liệu theo cách 2</h2>
@if (ViewBag.error != null)
{
<div class="alert alert-danger">@ViewBag.error</div>
}
@using (Html.BeginForm())
{
@Html.AntiForgeryToken()
<div class="form-horizontal">
<hr />
<div class="form-group">
@Html.Label("Mã thành viên", new { @class = "control-label col-md-2" })
<div class="col-md-10">
@Html.EditorFor(model => model.ID)
</div>
</div>
<div class="form-group">
@Html.Label("Tên đăng nhập", new { @class = "control-label col-md-2" })
<div class="col-md-10">
@Html.EditorFor(model => model.Username)
</div>
</div>
<div class="form-group">
@Html.Label("Họ và tên", new { @class = "control-label col-md-2" })
<div class="col-md-10">
@Html.EditorFor(model => model.Fullname)
</div>
</div>
<div class="form-group">
@Html.Label("Mật khẩu", new { @class = "control-label col-md-2" })
<div class="col-md-10">
@Html.PasswordFor(model => model.Password)
</div>
</div>
<div class="form-group">
@Html.Label("Tuổi", new { @class = "control-label col-md-2" })
<div class="col-md-10">
@Html.EditorFor(model => model.Age)
</div>
</div>
<div class="form-group">
@Html.Label("Email", new { @class = "control-label col-md-2" })
<div class="col-md-10">
@Html.EditorFor(model => model.Email)
</div>
</div>
<div class="form-group">
<div class="col-md-offset-2 col-md-10">
<input type="submit" value="Lưu" class="btn btn-default" />
</div>
</div>
</div>
}
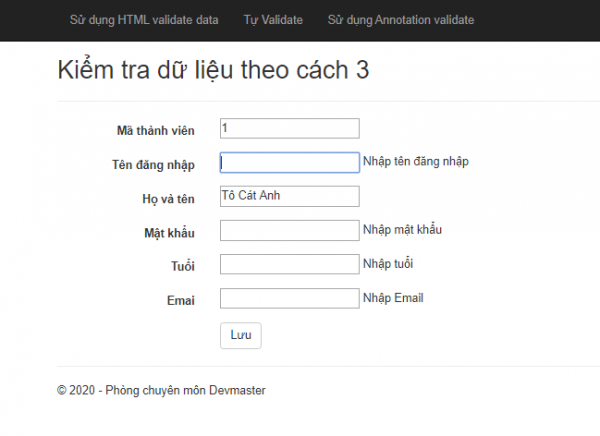
- CreateThree (tạo View tương tự CreateOne) , chỉnh lại code Razor theo gợi ý sau:
@model Lab05.Models.Member
@{
ViewBag.Title = "Kiểm tra dữ liệu theo cách 3";
Layout = "~/Views/Shared/_Layout.cshtml";
}
<h2>Kiểm tra dữ liệu theo cách 3</h2>
@using (Html.BeginForm())
{
@Html.AntiForgeryToken()
<div class="form-horizontal">
<hr />
@Html.ValidationSummary(true)
<div class="form-group">
@Html.Label("Mã thành viên", new { @class = "control-label col-md-2" })
<div class="col-md-10">
@Html.EditorFor(model => model.ID)
@Html.ValidationMessageFor(model => model.ID)
</div>
</div>
<div class="form-group">
@Html.Label("Tên đăng nhập", new { @class = "control-label col-md-2" })
<div class="col-md-10">
@Html.EditorFor(model => model.Username)
@Html.ValidationMessageFor(model => model.Username)
</div>
</div>
<div class="form-group">
@Html.Label("Họ và tên", new { @class = "control-label col-md-2" })
<div class="col-md-10">
@Html.EditorFor(model => model.Fullname)
@Html.ValidationMessageFor(model => model.Fullname)
</div>
</div>
<div class="form-group">
@Html.Label("Mật khẩu", new { @class = "control-label col-md-2" })
<div class="col-md-10">
@Html.EditorFor(model => model.Password)
@Html.ValidationMessageFor(model => model.Password)
</div>
</div>
<div class="form-group">
@Html.Label("Tuổi", new { @class = "control-label col-md-2" })
<div class="col-md-10">
@Html.EditorFor(model => model.Age)
@Html.ValidationMessageFor(model => model.Age)
</div>
</div>
<div class="form-group">
@Html.Label("Emai", new { @class = "control-label col-md-2" })
<div class="col-md-10">
@Html.EditorFor(model => model.Email)
@Html.ValidationMessageFor(model => model.Email)
</div>
</div>
<div class="form-group">
<div class="col-md-offset-2 col-md-10">
<input type="submit" value="Lưu" class="btn btn-default" />
</div>
</div>
</div>
}
Bước 5: Chạy kết quả và ấn từng muc để kiểm tra

Nguồn: Devmaster Academy


")
 - FullStack")

.png "Lập trình frontend với reacjs (Full)")

